Shooting time-lapse videos with the iPhone 4 is a blast, here’s how
Time lapse videos are one of the most beautiful and many times stunning, even, forms of video capture. A time lapse video is a sequence of many photos, which display the world in front of you in a fast seamless motion.
And if you thought time lapse videos are only for the pros, you’re wrong. Yes, there’s an app for that too… And if you don’t have an iPhone…
Bahh, I’m kidding. The TimeLapse app is a great iPhone/iPod Touch app, which puts you in control of your own short movie project. Chances are you’ll surprise yourself how good those videos actually can get with almost no effort.
Let me just say before we go on any further that this isn’t a sponsored article and I’m doing this as an expression of my passion of this feature. Still, when developers create great apps, there’s nothing wrong in saying thanks.
Moving on, when I downloaded this application from the App Store (just $1.99) I was a little bit skeptical. I’m not your regular imaging or movie buff and I thought that time lapse is a bit out of my league. But after I got to play with the settings for 10 minutes I found that with such a simple interface and options, even I could create a time-lapse video, worth spending 60 seconds on.
Check out my best attempt:
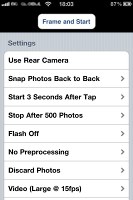
On first look, the app interface is a little bit miss-leading. It looks too simple to be serious, but that impression changed really fast.
It features settings about pretty much everything you may need to shoot a great time-lapse video – the number of shots, the interval between the shots, whether to save the raw photos so you can create the video on your PC or to just let the app create the video for you. You can choose the number of frames per second you want (the smoothness of the video depends on this), and you even have a choice of two effects for the videos – Smoothing and Double Shot, but they are not that practical so I suggest you leave them Off for starters.
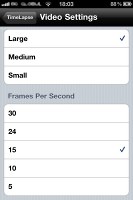

Now a good guideline to create a nice and smooth video is create a video with a framerate of 15 fps at least. Any lower and the video becomes choppy, higher is better in this case.
And keep in mind that for a great result, you really need a tripod or something steady, on which to place your iPhone or iPod Touch while the shooting takes place.
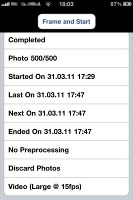
I shot my first videos with an interval of a second between each shot but the choice of interval would really depend on what you are shooting. If you go for a shooting a shot every second, you’d have 600 shots after a ten-minute shooting session. If you take my advice and create your video with a framerate of say, 20 frames per second, those 600 frames would make a total of 30 seconds of time-lapse video – not bad for a start and some experimenting. The video I showed you above included a total of 500 shots and I rendered it at 15 fps.
It took about 20 minutes to shoot all the photos for it. During that time I left the iPhone on a tripod and went about my usual business, which is blogging for you, as you might guess.
You can also look at these samples made with the TimeLapse app. Some are encoded by the app itself, while others are animated with a dedicated video editor on a computer. Nonetheless they’re worth watching, especially if you consider they are all shot with a phone.
It’s apps like this one that make your device all that special.
Hit the Source link for the full collection of videos.
Featured
 Samsung Galaxy S6 updated to Android 5.1.1: exploring the differences on video
 Benchmarking Asus ZenFone 2 ZE551ML with Intel Atom Z3580 SoC and 4GB of RAM
 Lenovo A7000 Preview
 Xiaomi Mi 4i battery life test
 HTC One M9+ preview
Categories
- Mobile phones
- Mobile software
- Mobile computers
- Rumors
- Fun stuff
- Various
- Android
- Desktop software
- Featured
- Misc gadgets
- Gaming
- Digital cameras
- Tablets
- iOS
- Desktop computers
- Windows Phone
- GSMArena
com - Online Services
- Mobile Services
- Smart Watches
- Battery tests
- BlackBerry
- Social Networks
- Web Browsers
- Portable Players
- Network Operators
- CDMA
- Windows
- Headphones
- Hands-on
Comments
Rules for posting